Ray Tracing is available on Snapchat filters and makes 3D objects more realistic
What is the Ray Tracing on Snapchat filters?
Ray Tracing is a feature that allows light to be reflected off 3D objects that have textures that allow it. Ray Tracing includes several features such as reflection, shadows, ambient occlusion, indirect lighting and refraction. Several other features will be integrated over time to make the experience even more accurate and realistic.
For example, on an object that contains metal, lenses will use light rays to make reflections appear on the metal parts. This will make the 3D objects even more realistic and pleasing to the eye.
Ray Tracing will therefore improve the rendering of Snapchat filters and in particular for 3D product try-ons, for AR games with 3D characters but also for architecture (buildings, windows, rooms...).
This is a huge boon for brands that want to use Snapchat's try-on to promote and offer virtual product fittings. Indeed, Ray Tracing will allow to create a real shopping experience with even more realistic 3D products. Users (and potential buyers) will be able to see how the product looks and feels in real life.
Contact
How to implement and integrate Ray Tracing in a Snap lens?
First of all, it is important to know that this technology is implemented directly in the Snapchat lens creation software: Lens Studio. So, you will already have to create a filter with one or more 3D models to be able to use Ray Tracing.
However, Ray Tracing does not work on some system configurations (macOS devices with Intel Iris GPU, High Sierra(10.13) and Mojave(10.14), Windows OS devices with Intel GPUs that are less powerful than Intel HD6xx series).

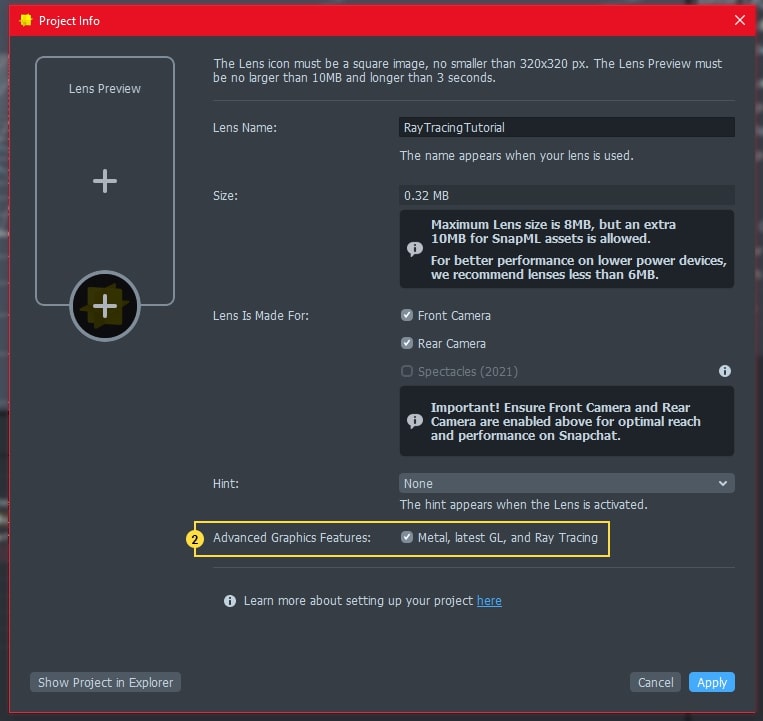
Step 1: Activate "Advanced Graphics Features
Before activating this option, take the time to save a backup of your project as activating this feature will lock in the capabilities of old materials and they will need to be updated.
When your filter project is open in Lens Studio and you have saved it, you need to go to the "Project Info" window and check the "Advanced Graphics Features" box.
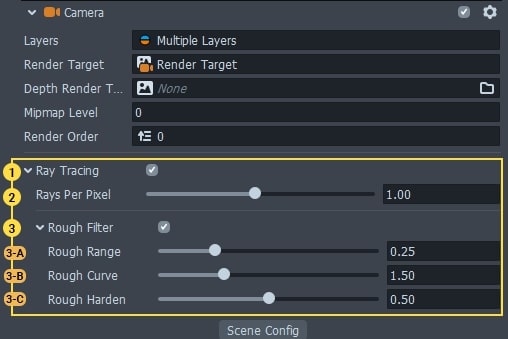
Step 2: Make global adjustments to the camera components
First, you need to enable Ray Tracing by checking the "Ray Tracing" box. Several settings will be available to adapt the Ray Tracing. Here is an explanation of each setting.
- Rays Per Pixel: This setting is set to 1 by default and allows you to manage the fidelity of the representation of the basic object. It should be noted, however, that the higher the Rays Per Pixel quality, the heavier the file will be.
- Rough Filter : This allows for the management of the raw reflection which manages the fading of reflections according to the distance and roughness value of the material.
- Rough Range : This parameter controls the maximum distance as a percentage of the scene dimensions to apply the filter. Lower values will only apply the filter to the transmitters closest to the receiver.
- Rough Curve : Allows you to adjust the weight of the roughness. Lower values will give a more blurred effect.
- Rough Harden : Allows the contact hardening to be reinforced or not by increasing the distance threshold.
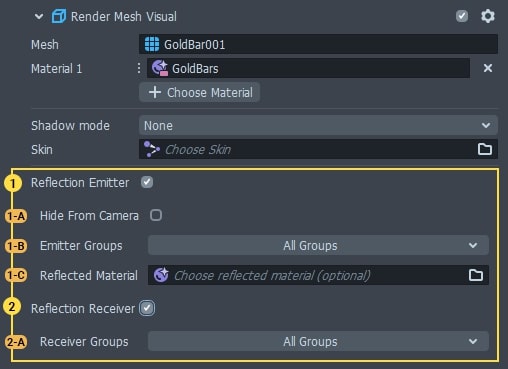
Step 3: Make Ray Tracing settings for objects in the Mesh Visual component renderer
Secondly, you must then manage the Ray Tracing settings for your objects. It is applied as a relationship between objects in the scene and is only supported with Meshes (Static and skinned meshes). The relationship is distinguished between Sender and Receiver and is defined from the "Render Mesh Visual Component".
- Reflection Emitters : meshes visible in "RT reflections" and contributes to the visual appearance of the reflection. It is activated by a "Reflection Emitter" checkbox.
- Hide from camera : Allows the mesh to be hidden so that it is not rendered in the camera but is still visible for reflections. This feature is mainly used for filter performance optimisation.
- Reflected Material : Allows the material displayed in the reflections to be overloaded. This only affects the visual elements in the reflections.
- Emitter Groups : Allows for improved performance of the Transmitters.
- Reflection Receiver : Checkbox for adding reflective objects that reproduce RT reflections.
- Receiver Groups : Improves receiver performance.
Snapchat did a comprehensive guide to understand and master all the notions and settings for Ray Tracing. Ray Tracing will become a very important feature for brands that want to offer Try On with Snapchat Lenses.
Our agency is specialised in the creation of Snapchat filters and since last year has become an official Snapchat partner in the field of augmented reality experiences. Contact us if you have any questions or projects.