Tutorial: How to Create an Instagram Filter?
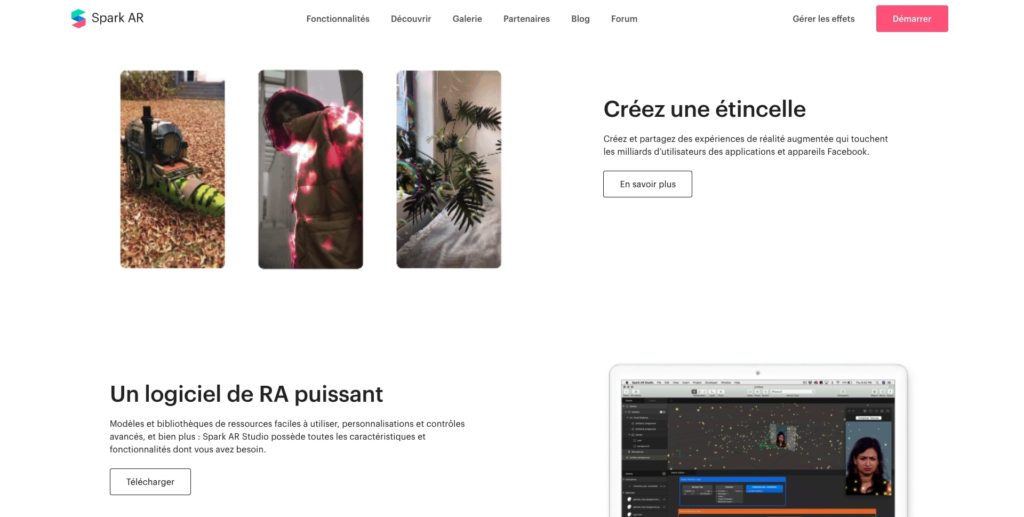
In recent years, it has become possible to create a Instagram filterThis was a major step forward for the social network. By giving free access to its effect creation software, Instagram wanted to encourage creators to come up with ever more innovative and unique content, enabling its users to express themselves in creative and original ways. This creative freedom has opened up new possibilities for creators, contributing to the popularity and growth of the social network. Here's a tutorial that will help you create your Instagram filter, with the elements you need to know: file type, file size, how to export the file your image and your various graphic elements and illustrations to convert.
Step 1: Download the Meta Spark software
This is the software for creating filters. Available at free of chargeIt allows you to create all the filters you see on Instagram. Several types of effects are possible, including face animation, AR game, 3D products and immersive packaging.
Contact
Step 2: Understanding the software
It is a complicated software to understand at the beginning because of its multiplicity of different functionalities, but when the basics are acquired, it becomes easy to produce a good quality filter. Before starting, you should know the lexicon of the software so that you don't get stuck for hours. Here are some of them:
Texture : This is an image file used to help define the appearance of an object in your scene. You can import .PNG or .JPG files for example.
Materials : The use of materials is used to determine the appearance of the surface of an object in your effect. For example, its degree of opacity or its reaction to light. You can add textures to materials, to add detail and interest.
Scene: is what will appear on the screen of the smartphone. It consists of the device, the camera and the focal length. This is where you can add objects that can be materials for example
Step 3: Create the visuals that will be in the filter
If you want to add elements to a filter, then you need to create them in software other than Spark AR such as Inkscape, Photoshop, Gimp, or software such as Canva that is accessible in all browsers. You can choose to include 3D or 2D elements as long as your filter is no larger than 4MB. You can then add them to Spark AR!
As you may have already guessed, before creating an Instagram filter, you need to create the visuals/assets you want to embed.
There are several types of assets, which we will introduce here:
- 2D assets PNG, JPEG and SVG formats (avoid importing vector file formats such as pdf and psd). Choose and save compressed elements.
- 3D models FBX 2014/2015, gITF 2, COLLADA, DAE, OBJ
- audios : Mono M4A, AAC codec with 44.1KHz sampling
- the fonts : TrueType, OpenType
To create your visuals, you can use any software you like as long as the assets are suitable for Spark AR.
However, care should be taken to the weight and format of the file since the Instagram filter should not be not exceed 4MB when publishing. It is therefore best to compress the assets before importing them into Spark AR. Also, if you have 2D visuals that do not contain a transparent background, it is best to import them as JPEGs.
Import texture assets
Now that all the assets are ready and compressed, you can open the Spark AR software. When you open the software, you have the choice to start creating an Instagram filter according to templates already made or to start from scratch.
Once you have made your choice, you then need to import your assets, which are transformed into textures in the software.
When you import your textures, the software offers you 3 solutions to compress them. This feature allows you to sort out each texture and the importance of compression for some. The automatic mode will compress your texture in the best way. The manual mode will allow you to control the compression settings and finally the last choice is not to compress the texture. However, it is best to optimise your assets before importing them as a texture into Spark AR.
To optimize your 2D textures, here are some tips:
- Make the textures as small as possible
- The maximum accepted resolution of a texture is 1024×1024 pixels. If you import a texture larger than this, it will automatically be rendered smaller on the
- It is preferable to have textures in square format (2×2, 4×4, 16×16 etc.)
To optimize your 3D textures :
- Do not import more than 50 3D objects
- The maximum number of vertices is 20,000 per object
- The number of triangles in a 3D object must be below 50,000
- In total, the number of triangles for all 3D objects in a filter should not exceed 150,000
There is also an AR Library that offers textures, 3D objects and lots of other free resources to make an Instagram filter.
Step 4: Animate the Instagram filter
For boost your effect and encourage more people to use it, it is necessary to create animations. For this you can choose to trigger an animation when the person opens their mouth or blinks for example. For this purpose there are different patches that allow you to do so.
Each patch has a single functionality and sends and receives information from other patches. With these, you can create a action process in your Instagram filter. There are many different types of patches but here are the families of patches:
- Interaction: interpreting the interactions of the person using the filter
- Face landmarks: capturing the exact position of the face
- Facial gesture patches: detect facial expressions (happy face, kissing face, surprise face)
- Animation patches: add animations
- Audio patches: managing and controlling audios
- Shaders: working on the appearance of textures and materials
- Math: add math functions
- Logic Patches: add logic to other patches (and, not etc)
- Utility Patches: many patches such as trackers
- Users interfaces patches: add UI functions to your effects

Making an Instagram filter is a long and tedious job and sometimes you have to try it out to perfect it. You can test it directly on your webcam or on your smartphone by sending a notification to your Instagram account or with the link to the effect.
Step 5: Publish the Instagram filter
When you are satisfied with your effect, don't forget to save your file. Then simply publish on Meta Spark Hub which is the platform to manage and analyse all your Instagram filters. All you have to do is log in with your Facebook account details and follow the instructions on the platform. Here are the details of the steps.
To do this, check that you have link your Instagram account to a Facebook account. If this is not the case, here is how to do it:
- Log in to your Facebook account from your computer
- Go to the settings of the Facebook page and go to the "Associated accounts" tab
- Click on Instagram and follow the steps explained by Facebook
Then, to publish your filter, you need to go through Spark AR Hub which is the platform for managing and publishing filters. Log in with your Facebook credentials and click on "Publish an effect".
Then the steps are as follows:
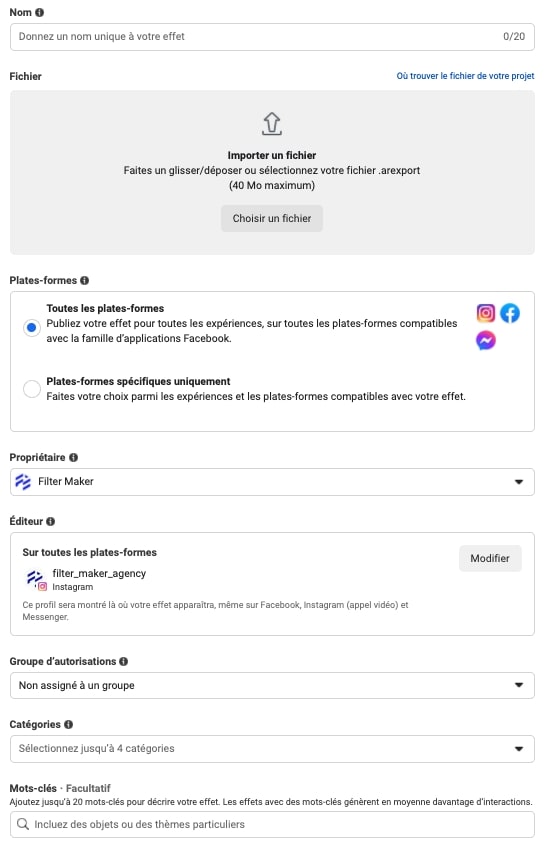
- Choose a name for your effect
- Import the .arexport file of your Instagram filter
- Select the social network Instagram, the owner and the account on which the Instagram filter will appear
- Choose the categories and keywords that match the theme of your filter
- Add a demonstration video (no longer than 15 seconds) and an icon
- Determine when your Instagram filter will be published
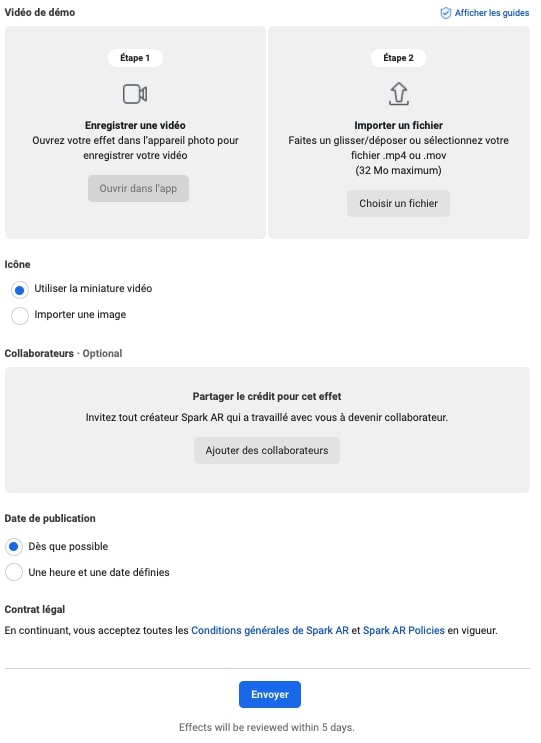
Before your filter is published, it will have to be submitted to Facebook moderators who will either approve or disapprove the effect depending on whether it complies with the Meta policy. It may take two to five days to receive a response. You're done! Well done!
Manage Instagram Filters
Once your filter is published, you can manage its visibility on the Spark AR Hub. There are also many statistics available to analyse the performance of your filter such as impressions, captures and shares.
Creating an Instagram filter is quite a time-consuming process, especially when you are not familiar with Spark AR software. Want to create a filter for your brand?